Guangzhou Xiantai – Professional Nail& Tattoo Sticker, Press-On Nail Manufacturer | OEM/ODM Services | 22 Years Experience

Leave Your Message
0%

A really neat sticker manicure can look like you didn’t even try too hard, but if you want it to last, it all comes down to the little details—making sure your nails are totally clean, sizing the stickers just right, and sealing the edges firmly. Since nail stickers are pretty thin, even a tiny bit of oil or a small wrinkle can make them peel sooner. The process itself is pretty straightforward; the tricky part is the prep work, which needs to be done carefully.

Just so you know, the advice here is more of a friendly tip rather than a quote from a pro. Nail educator Elena Brooks, although a fictional character, nicely sums it up: “Getting a smooth base and sealing the edges well is what really counts more than rushing through the application.” Think of that as a helpful tip, not an official statement. In reality, you want to wash and dry your hands first, gently push back any loose cuticles, and wipe your nails with alcohol. Pick a sticker that’s a little narrower than your nail—stretching it out can cause creases. When you apply it, start pressing from the middle outward, then fold or trim any excess, but don’t pull too hard or you might lift the sticker.

That tiny little edge you leave is super important—like, really makes a difference.

This guide will walk you through everything from picking out your nail sticker design to adding a top coat for extra protection. It also covers common issues like bubbles, corners that lift, or stickers that get too close to your skin. Just take your time with each layer and avoid soaking your hands right after you finish. Keep in mind, the outcome can vary depending on your nail shape, the quality of the stickers, and your daily habits. Even if you take your time, chips might happen a bit sooner than you'd like—that’s totally normal. No sticker manicure is completely chip-proof, but with care, you can definitely get a good few days out of it.
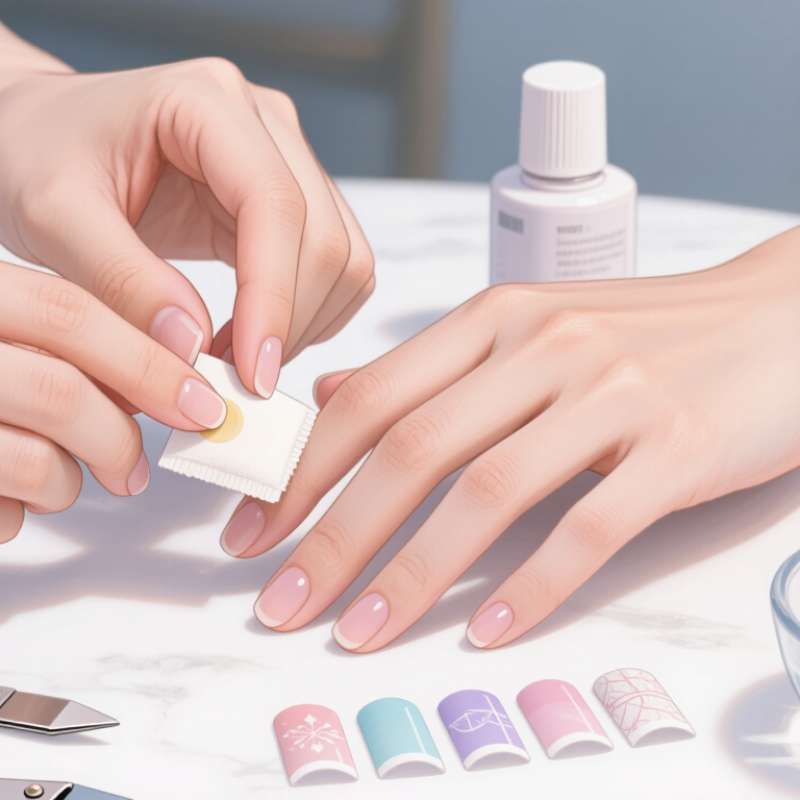
How to Apply Nail Stickers for a Long Lasting Manicure?

Choose nail stickers and prepare your workspace

Choose stickers that match each nail’s width without covering the skin. A close fit helps the edges lie flat and reduces lifting. If a design sits between two sizes, the slightly narrower one is often easier to place neatly. Check that the backing is smooth and the adhesive looks clean. Skip any sticker that is creased, dusty, or damaged.

Prepare your workspace and nails. Set up on a dry, steady table with bright light. Keep a nail file, lint-free wipes, and small scissors within reach. Wash and dry your hands, then gently push back loose cuticle edges; do not cut living skin. Wipe each nail to remove oil and dust. Even a little lotion can interfere with adhesion. Wait until the nail surface feels completely dry.

I once rushed this part and pressed a sticker onto a nail that still had cleanser on it. One corner lifted by evening. Annoying, but useful feedback. Lay out the stickers in application order before peeling anything, and keep them away from open windows or damp sinks. If your nails or surrounding skin are irritated, wait until they recover. Follow the product’s handling directions, especially if you have reacted to nail adhesives before.

Clean, shape, and lightly buff your nails

Clean, shape, and lightly buff your nails before applying stickers. Wash your hands with soap, then dry each nail thoroughly, including the edges. Any leftover moisture, hand cream, or natural oil can weaken the sticker’s grip. Use a lint-free wipe with nail cleanser to remove residue. Let the nails air-dry completely.

Shape nails with a fine file, moving in one direction to reduce peeling at the tips. Keep the length and shape comfortable; stickers can catch on rough edges. Lightly buff only the shiny surface with a soft buffer. The goal is a smooth, slightly matte nail, not a thin one. It is easy to over-buff when chasing a perfect finish. Stop if the nail feels warm or looks visibly scratched. Small details matter.

Tips: Brush away dust and check each nail under good light. A tiny ridge may lift a sticker later. If you spot one, smooth it gently rather than buffing the whole nail again. Prep can feel fussy, and one nail may still look less even than the others. That is usually better than removing too much natural nail. Wait a few minutes after cleaning before placing stickers. Do not rush.

Apply a base coat and let it dry completely

A smooth base coat gives Nail Stickers a cleaner surface and helps them stay in place. Start with clean, dry nails. Remove any leftover polish, then wipe away dust and oils with a lint-free pad. Even a little hand cream can interfere with adhesion. Apply a thin layer of base coat, covering the nail without flooding the cuticles or sidewalls. Thin is better. A thick coat may look dry on top while remaining soft underneath.

Let the base coat dry completely before placing any stickers. Follow the product’s drying instructions, and check that the surface feels firm rather than tacky. Don’t press a sticker onto a damp layer; it can slide, wrinkle, or lift at the edges later. Waiting can feel like the dullest part of a manicure, but rushing often costs more time. If one nail still feels soft, give it another minute. I’d rather wait too long than discover a smudge after decorating. Once dry, place each sticker carefully and smooth it from the center toward the edges to push out small air pockets.

How to Apply Nail Stickers for a Long Lasting Manicure? - Apply a base coat and let it dry completely

Step What to do Why it matters Practical check
1. Prepare nails Remove old polish, shape the nails, and gently push back the cuticles. Make sure the nail surfaces are clean and dry. Oil, dust, and moisture can interfere with polish and sticker adhesion. The nail plate feels dry and has no visible residue.
2. Apply a thin base coat Brush on an even, thin layer of base coat, keeping it off the surrounding skin and cuticles. A base coat helps create a smooth foundation and can reduce direct staining from colored polish. The coat looks even, with no thick pools near the edges.
3. Let it dry completely Allow the base coat to dry according to its product directions. Drying time varies with the formula, coat thickness, and room conditions. Applying stickers over tacky polish can cause slipping, wrinkles, or uneven adhesion. The surface is no longer wet or tacky before stickers are applied.
4. Place the sticker Choose a sticker that fits the nail, position it carefully, and smooth it from the center toward the edges. Smoothing helps remove air pockets and keeps the sticker flat against the nail. There are no obvious bubbles, folds, or lifted edges.
5. Seal the manicure If the sticker instructions allow it, apply a compatible top coat and lightly seal the free edge. Let it dry fully. A suitable top coat can add shine and help protect the sticker from everyday wear. The top coat is dry before the nails are exposed to friction or water.

Note: Follow the drying and application instructions provided with the base coat and nail stickers, as formulas and sticker materials can differ.

Position each sticker and smooth out air bubbles

Work on a clean, completely dry nail so the sticker can grip evenly. Choose a sticker that leaves a narrow gap around the cuticle and sidewalls; material touching skin can lift sooner. For 3d Nail Stickers, check the shape from above before pressing, since raised details can make small alignment errors more noticeable.

Hold the sticker with tweezers, or use a fingertip if it is easy to control. Set its center down first, then smooth toward the edges with a silicone tool or a clean finger. Use light, steady strokes. Don’t drag the sticker across the nail, which can stretch it or shift the design. A tiny bubble? Lift the nearest edge gently and lay it down again, smoothing outward. Avoid poking through the sticker; a hole may weaken its seal.

Check the edges under good light. I’ve found that rushing this part often leaves a wrinkle near the tip, even when the center looks smooth. Press along the free edge, then wait a moment before applying a clear top coat if the sticker instructions allow it. Keep the coat thin, and avoid flooding the cuticle area.

Trim excess sticker material and seal the edges

After applying a sticker, leave a slim margin at the nail tip rather than stretching it tightly over the edge. Trim excess with small nail scissors, then file gently downward in one direction. This helps prevent the sticker from catching on hair or fabric. Keep the file on the free edge, not the skin. A rough file or hurried sawing can lift the sticker before sealing even begins.

A clinical study by Yaemsiri and colleagues, published in the Journal of the European Academy of Dermatology and Venereology in 2010, measured average fingernail growth at about 3.47 millimetres per month. The study was small, so it is useful context, not a promise about manicure wear. As the nail grows, the tip takes repeated friction, making edge coverage important. Brush a thin layer of top coat across the sticker and slightly over the free edge. Let it dry fully. Not too thick.

For Uv Nail Stickers, follow the product’s curing directions, and keep uncured material off the surrounding skin. Check the edge in bright light; a tiny flap can be easy to miss. I’ve found that adding another heavy coat does not reliably fix a poorly trimmed edge. If the sticker is already lifting, remove or reposition it rather than sealing in a fold. Wait until the finish feels dry before washing dishes or handling rough fabric.

Protect your manicure during daily activities

Once you apply Red Nail Stickers, press each one firmly, especially along the edges. Keep your hands dry for the time recommended in the product instructions. A little patience helps the adhesive settle. I sometimes rush this step, then notice a corner lifting after washing my hands.

Daily chores can put extra stress on a manicure. Wear gloves while washing dishes or using household cleaners, and avoid soaking your hands in hot water for long periods. Dry your fingertips well afterward; moisture trapped around an edge can encourage peeling. Small habits matter. Use your fingertips, not your nails, to open cans, scrape labels, or pry at lids. It is an easy habit to forget.

Typing and handling bags may also catch a loose edge. If a sticker starts lifting, don’t pull it off; trim only the loose portion carefully, if the product directions allow, and smooth the remaining edge. A compatible clear top coat may add protection, but check the sticker instructions first, since some finishes can wrinkle or loosen the design. Keep a small file nearby for snags. I still catch myself using a nail as a tool, so protecting a manicure takes attention, not just careful application.

Wholesale Glow-in-the-Dark Semi-Cured Gel Nail Strips: Halloween Designs from China Factories

Halloween nail collections are moving beyond conventional polish as shoppers look for designs that combine seasonal impact with easy application. Grand View Research valued the global nail polish market at USD 14.3 billion in 2023 and forecast a 6.6% compound annual growth rate from 2024 to 2030. While this broad market estimate does not isolate semi-cured strips, it reflects the scale of demand for nail-color products and gives wholesale buyers useful context when planning seasonal assortments.

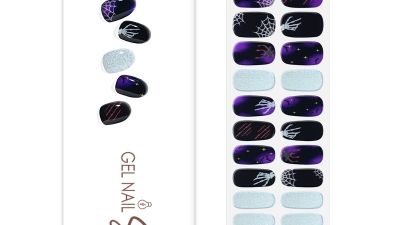
These glow-in-the-dark semi-cured gel nail strips from China factories feature spider webs and ghost-hand motifs on black and purple bases, with glitter accents for added depth. In low light, the designs emit a bright fluorescent green glow, making them suited to Halloween parties and other festive occasions. Designed for UV/LED curing, the strips offer a straightforward application process and up to 14 days of waterproof wear. Multiple sizes help accommodate different nail shapes, while wholesale availability supports retailers and distributors preparing seasonal stock. Buyers can also request product and compliance documentation from suppliers when evaluating quality and market suitability.

FAQS

How should I prepare my nails before applying stickers?

Wash and dry your hands well. Clean each nail with a lint-free wipe, then let it air-dry completely. Even a little oil can weaken the grip.

Should I buff my nails before applying stickers?

Lightly buff only the shiny surface. Stop if your nail feels warm or looks scratched. A slightly uneven nail is better than an over-buffed one.

How do I choose the right sticker size?

Pick one that leaves a narrow gap around the cuticle and sides. If it touches your skin, the edge may lift sooner. Check raised designs from above.

What is the best way to smooth a sticker onto my nail?

Place the center down first, then smooth toward the edges with light strokes. Don’t drag it across the nail. Small details matter.

What should I do if I see an air bubble?

Gently lift the nearest edge and lay it down again. Smooth outward with a clean finger or silicone tool. Avoid poking a hole.

Can I apply a clear top coat over nail stickers?

Check the sticker instructions first. If allowed, use a thin coat and keep it away from the cuticle. Too much polish may wrinkle the design.

How can I protect stickers during chores?

Wear gloves when washing dishes or using household cleaners. Dry your fingertips well afterward. Hot, prolonged soaking can encourage peeling.

What should I do if a sticker corner starts lifting?

Don’t pull it off. If the instructions allow, carefully trim only the loose part and smooth the edge. I still catch myself using nails to open things.

Conclusion

For a long-lasting manicure, start by choosing Nail Stickers that fit your style and setting up a clean, well-lit workspace. Prepare your nails by washing and drying your hands, shaping each nail, and gently buffing the surface to create a smooth base. Apply a thin coat of base coat and allow it to dry completely before continuing. This helps the stickers adhere evenly and reduces the chance of lifting.

Place each sticker carefully, centering it on the nail without touching the cuticle or skin. Smooth it from the middle outward to remove air bubbles, then trim away any excess material and gently seal the edges. Finish with a protective top coat if suitable for your stickers, and let everything dry fully. To help preserve your manicure, wear gloves for wet or messy tasks, avoid picking at the stickers, and treat your nails gently during everyday activities.
Sophie

Sophie

Sophie is a dedicated marketing professional with a deep-seated passion for beauty and innovation. With extensive expertise in the dynamic landscape of cosmetic products, she plays a pivotal role in promoting an array of unique offerings, including gel nail strips, nail polish stickers, 3D nail......
Previous Top 10 Types of Non Permanent Tattoos for Global Buyers